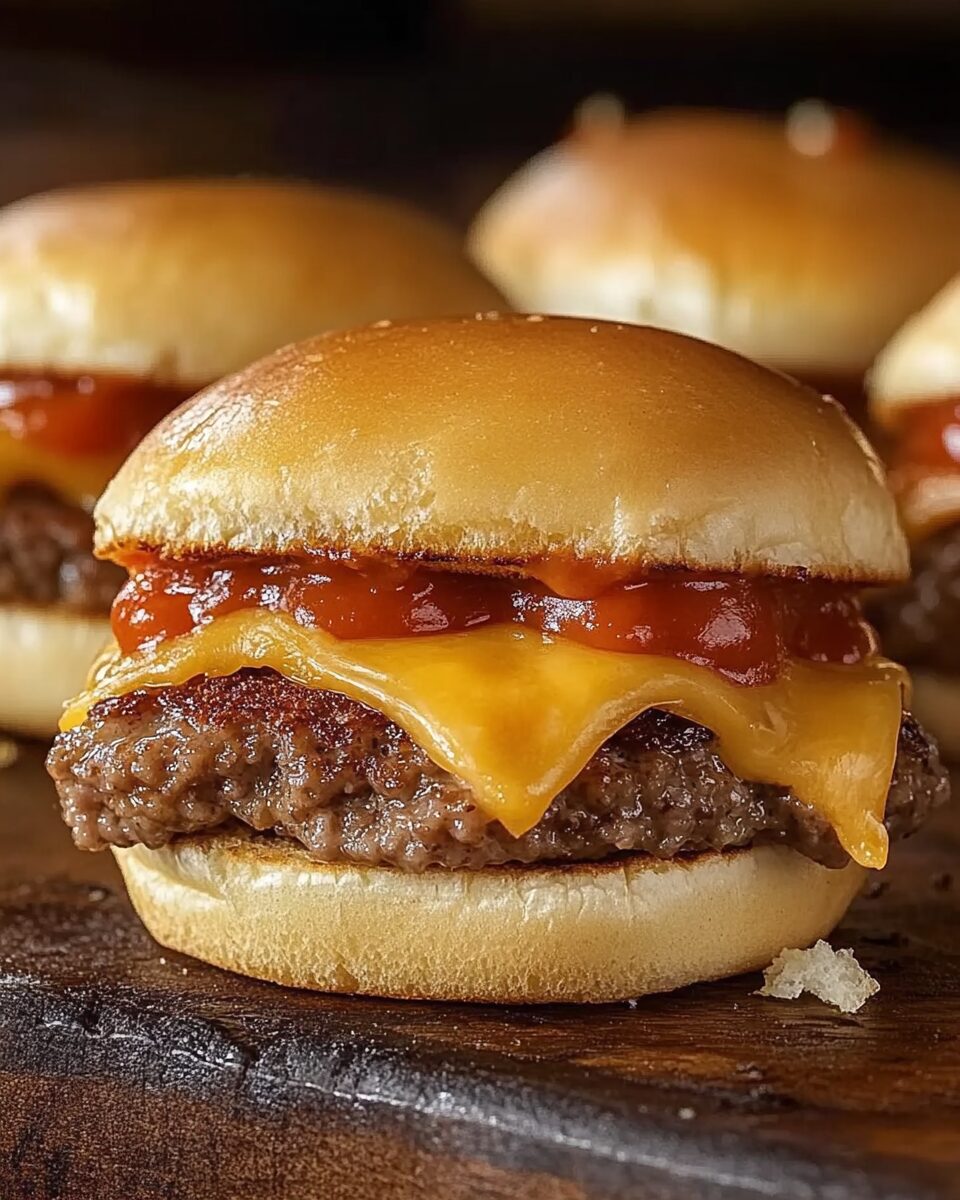
These Easy Cheeseburger Sliders are the ultimate combination of juicy beef, melty cheese, and buttery toasted buns. Perfect for feeding a crowd or satisfying weeknight cravings, these sliders are easy to make and absolutely delicious. Each bite is packed with flavor, from the seasoned beef patties to the tangy dill pickles and creamy condiments.
Whether you’re hosting a party, planning a game-day snack, or looking for a quick and satisfying dinner, these sliders have you covered. Their compact size and irresistible flavor make them a favorite for all ages. With just 25 minutes from start to finish, you’ll have a tray of cheesy, savory sliders ready to delight your guests or family.
Full Recipe:
Ingredients:
- 12 slider buns
- 1 lb ground beef
- 1 teaspoon garlic powder
- 1 teaspoon onion powder
- 1/2 teaspoon salt
- 1/2 teaspoon black pepper
- 6 slices of cheddar cheese, halved
- 2 tablespoons butter, melted
- 1 tablespoon sesame seeds (optional)
- 1/2 cup mayonnaise
- 1/4 cup ketchup
- 12 small dill pickle slices
Directions:
- Preheat your oven to 350°F (175°C). Line a baking sheet with parchment paper.
- In a large bowl, combine ground beef, garlic powder, onion powder, salt, and black pepper. Mix until evenly combined.
- Divide the mixture into 12 equal portions and shape them into small patties.
- Heat a skillet over medium heat and cook the patties for 2 minutes on each side, just enough to sear the surface.
- Place the bottom halves of the slider buns on the prepared baking sheet. Spread mayonnaise and ketchup evenly on each bun.
- Place a cooked beef patty on each bun, top with a half slice of cheddar cheese, and cover with the top bun.
- Brush the tops of the buns with melted butter and sprinkle with sesame seeds if desired.
- Bake in the preheated oven for 10-12 minutes, or until the cheese is melted and the buns are lightly toasted.
- Serve warm with dill pickle slices on top or on the side.
Prep Time: 10 minutes | Cooking Time: 15 minutes | Total Time: 25 minutes
Kcal: 285 kcal per slider | Servings: 12 sliders
History and Origin
Cheeseburgers have long been a staple in American cuisine, with origins tracing back to the 1920s. The idea of combining a juicy beef patty with melted cheese was first popularized in California diners and quickly spread across the country. Sliders, or mini burgers, became famous in the 1940s, pioneered by fast-food chains like White Castle, who served small, flavorful burgers perfect for quick bites and gatherings. This recipe combines the classic cheeseburger flavors with the slider’s shareable size, making it ideal for modern-day parties or casual family meals.
Tips for Perfect Sliders
- Choosing the Beef: Use ground beef with a fat content of 80/20 for the juiciest patties. The fat helps keep the meat tender and flavorful during cooking.
- Toasting the Buns: Brushing the buns with melted butter and toasting them adds a layer of crispiness and buttery flavor. You can add garlic powder or parsley to the butter for extra aroma.
- Customizing Cheese: Cheddar is a classic choice, but you can swap it for American, Swiss, or pepper jack cheese for variety.
- Adding Vegetables: For a healthier twist, top your sliders with fresh lettuce, tomato slices, or sautéed onions.
- Condiment Options: Apart from mayonnaise and ketchup, you can experiment with mustard, barbecue sauce, or a zesty burger sauce.
Serving Suggestions
- Side Dishes: Pair these sliders with classic sides like French fries, onion rings, coleslaw, or a fresh green salad. For a healthier option, try serving them with baked sweet potato fries or roasted vegetables.
- Drinks: These sliders are perfect with fizzy sodas, milkshakes, or even a cold beer for adults.
Customizable Options
- Make It Spicy: Add sliced jalapeños to the patties or sprinkle chili flakes on top of the cheese for a spicy kick.
- Healthier Version: Use ground turkey or chicken instead of beef, and serve the sliders on whole-grain buns.
- Vegetarian Twist: Substitute the beef patties with plant-based patties or portobello mushrooms for a veggie-friendly option.
- Toppings Galore: Add crispy bacon, avocado slices, or caramelized onions for a gourmet upgrade.
FAQs About Cheeseburger Sliders
Q: Can I prepare the sliders ahead of time?
A: Yes! You can prepare the patties and assemble the sliders a few hours ahead. Store them in the fridge and bake them when ready to serve.
Q: Can I freeze the sliders?
A: Absolutely! Cook the patties, assemble the sliders, and freeze them individually wrapped in foil. Reheat them in the oven at 350°F (175°C) for about 15 minutes before serving.
Q: How can I make these sliders gluten-free?
A: Swap out the slider buns for gluten-free buns or lettuce wraps for a low-carb, gluten-free option.
What Makes Cheeseburger Sliders Special?
Cheeseburger sliders are not just another burger recipe—they’re a perfect combination of flavor, convenience, and shareability. Their bite-sized design makes them great for parties, game days, or even family dinners. With perfectly seasoned beef, gooey melted cheese, and soft buttery buns, they pack all the deliciousness of a full-sized cheeseburger into a few satisfying bites.
What sets these sliders apart is how customizable they are. Whether you want to make them spicy, keep them kid-friendly, or turn them into a gourmet treat, there’s no limit to how you can make these your own.
Why You’ll Love This Recipe
- Quick and Easy: With only 25 minutes from start to finish, this recipe is perfect for busy weeknights or last-minute gatherings.
- Crowd-Pleaser: Everyone loves sliders—kids, adults, and even picky eaters!
- Customizable: You can easily switch up the toppings, cheese, or condiments to suit your taste.
- Perfectly Portion-Sized: These small burgers are ideal for sharing, snacking, or portion control.
Nutritional Insights
Each slider is approximately 285 calories, making them a satisfying treat without being overly indulgent. With a good balance of protein from the beef and carbohydrates from the buns, they’re filling yet light enough to pair with sides like a fresh salad or crispy fries.
Best Occasions to Serve Cheeseburger Sliders
- Game Day Gatherings: Perfect finger food for sports events.
- Parties and Potlucks: A hit at any social gathering, as they’re easy to grab and eat.
- Family Dinners: Great for a quick, satisfying meal that kids and adults will both enjoy.
- Holiday Buffets: A fun addition to any holiday spread, especially when served alongside dips and appetizers.
Storage and Reheating Tips
- Storing Leftovers: Place leftover sliders in an airtight container and refrigerate for up to 3 days.
- Reheating: Warm them in the oven at 350°F (175°C) for 5-7 minutes to maintain their texture and flavor.
- Freezing: Cook the patties, assemble the sliders, and freeze them individually wrapped in aluminum foil. Reheat directly from frozen for about 15 minutes.
Pro Tips for Perfect Sliders
- Don’t Overwork the Meat: Mixing the ground beef too much can make the patties dense. Gently combine the seasoning with the beef for the best texture.
- Sear the Patties: Searing the patties before baking locks in the juices and creates a caramelized crust for extra flavor.
- Even Cooking: If making a large batch, bake the sliders on a wire rack placed over a baking sheet to ensure even cooking.
- Use Fresh Buns: Fresh, soft slider buns are key to achieving the perfect bite. Toasting the buns with butter also enhances the flavor.
Fun Variations to Try
- Bacon Cheeseburger Sliders: Add crispy bacon slices for a smoky, savory twist.
- Spicy Sliders: Add a dollop of sriracha mayo or sprinkle chili flakes into the patty mix.
- Gourmet Touch: Top the sliders with caramelized onions, arugula, and truffle aioli for a fancy version.
- Breakfast Sliders: Add a fried egg and swap the cheese for Swiss to turn these into breakfast burgers.